At A Glance
You use the Address Book app to capture contact information for people and organizations inside your business as well as external organizations with which you might have a contract. When you create an address book entry for a person or group, that person becomes available to select in other fields throughout the system. For example, you must create an address book entry for a person or organization before they can be associated with a contract record.
 |
You must have permission to access this app as well as parts of the functionality described below. If you think you need access to part of this app but you do not see it in your user account, contact your internal system administrator. |

| |
Create New Entry: Click here to enter a new address book entry. |
| |
Individual and Organization: Click on the appropriate tab. |
| |
For additional search options, you can select from the dropdown menu to specify a type of individual or organization. |
| You can search a National Provider Identifier or NPI. It is a unique 10-digit identification number issued to health care providers. |
The Address Book Entry includes the following tabs:
-
- Record Details
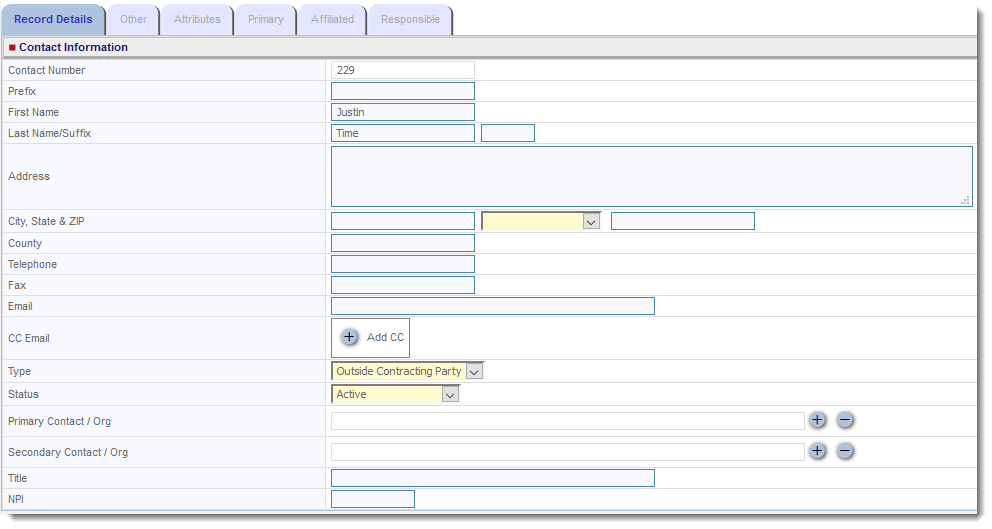
This tab shows contact information about the entry.

- Record Details
- Other
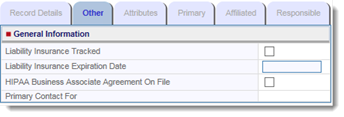
This tab shows general information about the entry.

- Attributes
This tab stores relevant information that is configured by your administrator.

Primary, Affiliated, and Responsible Tabs
The Primary, Affiliated, and Responsible tabs also appear in the Address Book app, but you cannot enter information in these tabs. The system automatically populates these tabs from contract record data based on the latest datasheet. Each tab shows the icon to view contract records where this address book entry is listed as the related party type on the latest datasheet.
- Primary
This tab shows any contract records that the individual or organization is listed as a primary party.

- Affiliated
This tab shows any contract records that the individual or organization is listed as an affiliated party.

- Responsible
This tab shows any contract records that the individual or organization is listed as a responsible party.

- Default Party Settings
If this tab appears, this indicates the organization is set up as an owner organization/internal contracting entity. If you want a default party to automatically be added to a contract record when this owner organization is selected, you can use the Default Party Settings tab to set that up.
Adding a New Address Book Entry for an Individual
Use the following steps to create an Individual address book entry from the Address Book app:
- Click on the Apps menu.

- Select the Address Book app.

- By default the Individual tab is open.

- Click Create New Entry.

5. Complete the information in the Record Details tab as described below:
- The Contact Number is automatically generated by the system.
- In the Contact information fields, complete the contact information for the individual. A first and last name is required.
- From the Type dropdown menu, select the Address Book Type that applies for the entry. This is a required field.
- From the Status dropdown menu, select the status of the contact. This usually will be inactive or active and is determined by your internal system administrator.
- From the Primary Contact / Org and Secondary Contact / Org fields, click on the + to search within the database. The search can be determined by key word or by type. To choose an individual or organization click on the word “Select” next to that organization.
- In the Title field, enter the individual’s title within the organization.
- If applicable to the individual, in the NPI field enter his/her National Provider Identifier.
6. Complete the information in the Other tab as described below:
- Select the Liability Insurance Tracked checkbox if liability insurance must be tracked for this organization or individual.
- In the Liability Insurance Expiration Date field, enter the expiration date for the certificate of liability insurance as MM/DD/YYYY.
- Select the HIPAA Business Associate Agreement On File checkbox if this party has a HIPAA Business Associate Agreement on file.
- The Primary Contract For area displays the organization that has this individual as its contact person.
7. If directed by your internal system administrator, complete the information in the Attributes tab as described below:
The Attributes tab stores relevant information that is configured by your administrator. Attributes are customized fields that can be used to store additional information related to an address book entry. This information is contained on the Attributes tab and may be of a sensitive nature. Changes to attribute data can have an impact on workflow routing and contract record generation.
- Enter the Attribute Name.
- Select the Attribute Type from the dropdown menu.
- Depending on the Attribute Type selected, enter the Attribute Value.
- Click on the + to add the attribute to the address book entry. Once added, you can edit by clicking on the pencil or delete the entry by clicking on the trashcan.
The Primary, Affiliated, and Responsible tabs also appear on this screen, but you cannot enter information in these tabs. The system automatically populates these tabs from contract record data.
8. Click Save.
Adding a New Address Book Entry for an Organization
Use the following steps to create an Organization address book entry from the Address Book app:
1. Click on the Apps menu.
![]()
2. Select the Address Book app.

3. Select the Organization tab.

4. Click Create New Entry.

5. Complete the information in the Record Details tab as described below:
- The Contact Number is automatically generated by the system.
- In the Contact information fields, complete the contact information for the organization. The organization field is required.
- From the Type dropdown menu, select the Address Book Type that applies for the entry. This is a required field.
- From the Status dropdown menu, select the status of the contact. This usually will be inactive or active and is determined by your internal system administrator.
- In the Primary Contact / Org or Secondary Contact/Org fields, click on the + to search within the database. The search can be determined by key word or by type. To choose an individual or organization click on the word “Select” next to that organization.
- In the URL field, a website can be entered.
- In the Description field, enter an optional description of the organization.
- If applicable, in the NPI field enter the National Provider Identifier.
- If applicable in the TIN field enter the organization’s Taxpayer Identification Number.
6. Complete the information in the Other tab as described below:
- Select the Liability Insurance Tracked checkbox if liability insurance must be tracked for this organization or individual.
- In the Liability Insurance Expiration Date field, enter the expiration date for the certificate of liability insurance as MM/DD/YYYY.
- Select the HIPAA Business Associate Agreement On File checkbox if this party has a HIPAA Business Associate Agreement on file.
- The Individuals area displays the individual that is a primary contact of this organization.
7. If directed by your internal system administrator, complete the information in the Attributes tab as described below:
The Attributes tab stores relevant information that is configured by your administrator. Attributes are customized fields that can be used to store additional information related to an address book entry. This information is contained on the Attributes tab and may be of a sensitive nature. Changes to attribute data can have an impact on workflow routing and contract record generation.
- Enter the Attribute Name.
- Select the Attribute Type from the dropdown menu.
- Depending on the Attribute Type selected, enter the Attribute Value.
- Click on the + to add the attribute to the address book entry. Once added, you can edit by clicking on the pencil or delete it by clicking on the trashcan.
The Primary, Affiliated, and Responsible tabs also appear on this screen, but you cannot enter information in these tabs. The system automatically populates these tabs from contract record data.
Additionally, a Default Party Settings tab might also appear. See the Administrator Guide for more information.
8. Click Save.
Searching the Address Book for an Individual
To search for an individual, follow the steps below:
1. Click on the Apps menu.
![]()
2. Select the Address Book app.

3. By default the Individual tab is open.

4. Select your operator for your desired search field (Last Name, First Name, or Organization). You have the option of two operators:
- Starts with – The system returns address book entries whose first characters match your search term.
- Contains – The system returns address book entries that contain your search term anywhere in the field. This is the most common operator to choose because it gives you flexibility if you type only part of a name or other word.
5. Enter your search term or NPI.
6. From the Individual Type dropdown menu, specify a type.
7. By default only active entries are returned in the search results, to include inactive records in the search results, check “Include Inactive”.

8. Click Search. The results will appear below in the Search Results pane.

9. Click Select next to the individual’s name to open the Address Book Entry.

Searching the Address Book for an Organization
To search for an organization, follow the steps below:
1. Click on the Apps menu.
![]()
2. Select the Address Book app.

3. Select the Organization tab.

4. Select your operator. You have the option of two operators:
-
- Starts with – The system returns address book entries whose first characters match your search term.
- Contains – The system returns address book entries that contain at least your search term. This is the most common operator to choose because it gives you flexibility if you type only part of a name or other word.
Additionally, you can select the checkbox to show only internal organization owners.
5. Enter your search term.
6. From the Organization Type dropdown menu, specify a type.
7. By default only active entries are returned in the search results, to include inactive records in the search results, check “Include Inactive”.
8. Click Search. The results will appear below in the Search Results pane.

9. Click Select next to the organization’s name to open the Address Book Entry.

