A user is a record in the system that represents a person who uses the software. System administrators have access to the tools to manage users.
The user account is:
- associated with an address book entry for contact information
- where you can manage user permissions and roles to control which parts of the system the user has access to
- where you can optionally set other permissions. These permissions grant access in addition to the roles that are assigned only if the permissions are greater than those granted by a role.
When a user has multiple roles, the user has access to everything that is granted by any of the roles, in addition to the access granted by the user’s particular permissions. For example, if the contract administrator role does not have access to workflow but the manager role has Start Access to the workflow, then the contract administration manager who is assigned to both roles would have Start Access.
Requesting a New User
Note: This is for clients not using single sign-on.
Users can request a username or alternatively, system administrators have the ability to request user names for their users.
To request a new user:
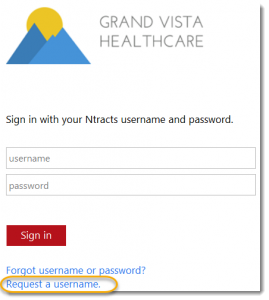
1. From the sign in page, click Request a username.

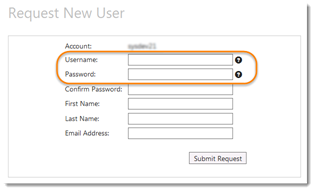
2. Enter the Username and Password. The user will use this username to sign in to Ntracts.
| The New Username request form will perform a validation on the username and email address fields before the form can be submitted. Hover over the question marks for more assistance. Passwords will expire every 180 days. Username: The validation is performed on the length of the value. A message will be displayed if the number of characters exceeds the maximum limit. |
A password must meet the following requirements:
-
- Be at least seven characters long
- Contain characters from the following:
English uppercase characters (A – Z)
Numerical digits (0 – 9)
Special character (for example, !, $, #, %)

3. Enter the user’s password again in the Confirm Password field.
4. Enter the user’s contact information.
 |
Email address: The validation is performed on the format of the value. A message will be displayed if entry does not meet the format requirement. |
5. Click Submit Request.
The following dialog box will be displayed:

Once submitted, the designated approver will receive the request and will need to approve the request before the user can use Ntracts.
Approving a New User Request
Note: This is for clients not using single sign-on.
To approve a new user:
1. From the Nbox of the new user request approver, click the message line “New user:______” to view the action details in the reading pane below.

| You can expand the message list or the reading pane by hovering over the purple horizontal line between the message list and message details. Once you see the cursor with the north and south arrows, drag down to expand the message list area. Alternatively, click on the orange horizontal line segment in the center to expand the message details to full screen. Click on it a second time to have the message list reappear. |
2. Review the information in the Action Details section. If for any reason the username or email should not be used, this request should be declined and resubmitted. No changes can be made once approved.

3. In the Approve New User section, select the desired radio button to approve or not approve the user.
If Approved is selected, continue to Step 4.
If Declined is selected, enter your message below prompting for an explanation to the requestor. Click Finish (mark complete). You have completed the survey and can disregard the rest of these steps.

4. In the New User Details section, make the appropriate selection in the Password field:
If Force Password Reset is selected, a temporary password field will appear. The password entered in this field must match the password entered on the request form. The password is then included in the email message to the new user and then the user is prompted to change password on first sign in.
If Use the Password Provided During Request is selected, the user will keep the password used when the request was created.

5. To avoid duplicate Address Book entries, search for the user in the Search for User in Address Book field. Any matches to your search appear below the field. If there is a match to the user, select the name and skip to Step 10.
| If the email address used during the request does not match the one associated with the selected Address Book entry, the system will update the entry to reflect the one used during the request. If Nbox messages are waiting, two tabs will appear in the Nbox reflecting both email addresses. |

6. If the user does not have an existing Address Book entry, click outside of the search field and then select the Create new address book entry radio button.

7. From the dropdown menu, select the contact type for the user’s address book entry.

 |
Verify your selections for Steps 3-7 are accurate because no changes can be made after clicking Create User. |
8. In the Instructions section, click Create User.
9. After reading the confirmation message, click OK.

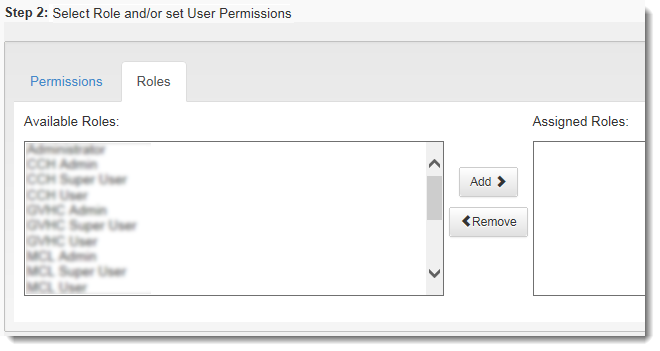
10. Select the user permissions on the Permissions and/or Roles tab. For more information on making these selections, see Creating or Editing a Role.

11. Select the checkbox to confirm that the new user has the necessary roles and permissions.
12. Click Finish (mark complete) to complete the survey. The user will receive an email
notifying him/her of the approval. The user is now able to sign into Ntracts.
![]()
Creating a New User Through the Administration Menu
1. From the Administration menu, select Security Admin.
2. From the left menu, click Manage Users. The User Management screen will open.
3. Click + Add User button in the upper right.
4. Start by searching for the new user in the Select… dropdown by typing in the individual’s name.
If the individual’s name is found in the dropdown, select the name to relate the address book record to the user account. Some fields will auto-populate based on completed information in the existing address book entry. Any updates made to contact fields on this screen will update the Address Book entry, so review the information carefully and make any necessary changes.
If the individual’s name is not found in the dropdown, he/she must be added to the address book. Click on the Add new address book entry slider in the upper right. This will result in unlocking of certain fields so that a new address book entry can be created.
5. Complete or review the Add User form.
A password must:
– be a minimum of seven characters & contain at least one uppercase character (A-Z)
– contain at least one numeric digit (0-9)
– contain at least one special character (examples: !,$,#,%)
Single Sign-On Note: If using SSO, leave the Password field blank.
Type- Select the address book type for the user
Status- All users need to be marked Active to sign into the system.
6. Click Save. The user is now in the system.
7. Assign the user permissions and/or security role(s). To do this, you would locate the user and use the Actions menu to assign permissions and/or role(s). See the section on this page titled Managing User Permissions.
8. Notify the user of his/her username and temporary password. The first time the user signs in, he/she will be prompted to reset their password.
Making a User Inactive
If a user’s access to the system needs to be restricted, administrators can modify a user’s account by making it inactive. This does not remove the user from the system. All records associated with this user remain.
To restrict access to Ntracts:
1. From the Administration menu, select Security Admin and click Manage Users from the left menu.
2. In the User Management screen, select the user you want to restrict from the system.
3. In the Status column, click the slider to change it the user to inactive. Alternatively, you can select the Actions menu and click Edit User. On the Edit User window, locate the Status section. Select Inactive. Click Save.
4. A pop-up will appear for you to confirm the deactivation. Click Confirm.
Managing Roles Assigned to a User
A role(s) is assigned during the new user set-up process. Administrators have the ability to edit the role(s) assigned to the user. You can assign multiple users to a role and/or multiple roles to a user.
To assign a role to a user:
1. From the Administration menu, select Security Admin and click Manage Users from the left menu.
2. In the User Management screen, locate the user you want to add to a role(s )to by selecting Actions menu and click Edit Roles.
3. From the Available Roles side, place a checkmark next to the role(s) you wish to assign to this user.
4. Click the arrow to move the role(s) to right or Assigned Roles side.
5. Click Save.
To remove an assigned role(s):
1. From the Administration menu, select Security Admin and click Manage Users from the left menu.
2. In the User Management screen, locate the user you want to remove the assigned roles to by selecting Actions menu and click Edit Roles.
3. From the Assigned Roles side, please a checkmark next to the role(s) you wish to remove from this user.
4. Click the arrow to move the role(s) to the left or Available Roles side.
5. Click Save.
Managing User Permissions
1. From the Administration menu, select Security Admin.
2. From the left menu, click Manage Users. The User Management screen will open.
3. Search for the user.
4. From the Actions drop down, select the desired permission. Note: These are user permissions that can be granted alone or in addition to a security role.
Workflow Permissions– Select the desired Access Level for the user.
Scheduler Access- legacy tool for system admins that is being phased out
Start Access- allows user to access the Start menu to begin a workflow
No Workflow Access- prevents the Start menu from appearing.
Below that are Categories for the Start menu. Think of them as folders that workflows can be placed in. Click Submit to save.
Contract Permissions– Assign what contract records or summaries this user needs to access. There are 4 levels of contract access- with the most permissive being Contract Read and Write, followed by Contract Read Only, Summary View with Documents, and Summary View. You can set contract access by owner organization, department, and contract type or a related combination of any of the three.
Examples:
If a user needs access to all Finance contracts regardless of organization or department, select Finance from the Type dropdown and click the plus sign.
If a user needs access to Finance contract records only within a specific organization. Make the desired selections from the Organization and Type dropdowns, and then click the plus sign.
Once you’ve completed adding the desired contract permission(s), click Submit. To remove a permission, click the minus sign.
Tab Permissions– select the desired permissions for the Actions tab found on the contract record and custom tabs, when applicable
Actions Tab- 3 levels of Actions tab access with Full Details (list with clicking to see message & any responses) being the most permissive, followed by List Only and then No Access to the Actions tab
Custom Tabs- select the desired custom tab from the dropdown and click the plus sign.
3 levels of access with Read and Write being the most permissive, followed by View (no editing ability) and then No Access
Other Permissions– control the other tabs and apps. You can hover over each one for a description. If you select the main one, you give permissions to all the sub ones in that grouping.
Example:
If a user needs to create and edit address book entries, select /All Permissions/Address Book/.
If a user should not be able to create new address book entries or edit them but does need to view them, select /All Permissions/Address Book/View/.
On the left side, check the desired permission(s) and click the top arrow. It now appears as an Assigned Permission. Make your selections and click Save. To remove an assigned permission, select the assigned permission you wish to remove and click the bottom arrow.
Effective Contract Access– informational page displaying a user’s contract access across owner organizations, departments, and types and how the access was received. This is great for clarifying what access level the user has and how the user received the access.