Nbox At a Glance
The Nbox is a tool for communication within the site for required actions and/or notifications that a user receives. Workflows use Nbox messages to interact with users to keep the workflow moving. An email may be sent with a summary of your Nbox activity to the email address registered with your Ntracts account.
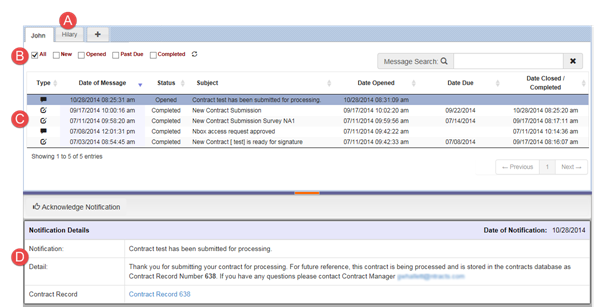
|
|
Nbox Tabs |
|
|
Filter Tools |
|
|
Message List Four types of messages can appear in your Nbox:
|
|
|
Message Details |
Setting Up Your Nbox
1. After signing into Ntracts, click Nbox on the menu bar.
![]()
2. The Add an Nbox Tab window appears. Your email address has been auto-populated. Type your name in the Name field as you wish it to appear on the tab. The Permission Level Requested is defaulted to View and Respond to Nbox Messages.
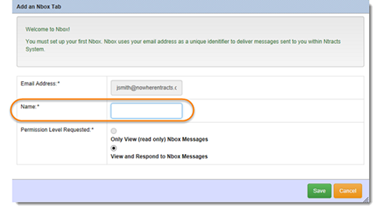
3. Click Save.
4. Click Nbox on the menu bar.
![]()
5. Click Refresh List.

Nbox Navigation
Click on the message to display the message details in the reading pane.
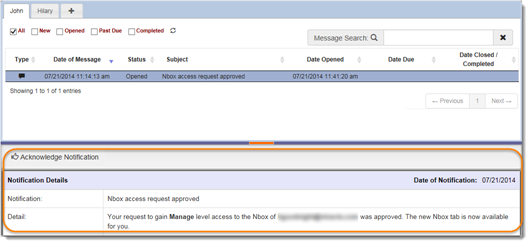
You can expand the message list or the reading pane by hovering over the purple horizontal line between the message list and message details. Once you see the cursor with the north and south arrows, drag down to expand the message list area.
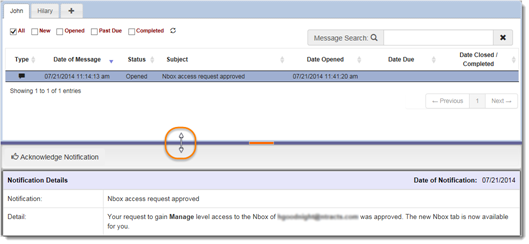
Click on the orange horizontal line segment in the center to expand the message details to full screen. Click on it a second time to have the message list reappear.
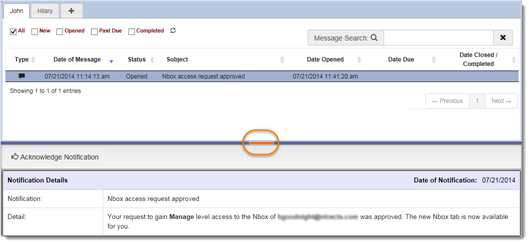
You can page through your Nbox messages by using the Previous or Next buttons, as well as clicking on the numbered pages.
Responding to an Nbox Action 
An Action message appears in the Nbox with a pen/paper icon. It is a request for you to perform a task.![]()
1. Click anywhere on the Action row. Message details will appear in the reading pane below.
2. Fields marked with an * require information. Then click Finish (mark complete) so that your information can be routed to the next individual in the workflow.

If you do not have all the information you need when you first open the Action message, you can partially complete the form and click Save Changes (finish later) to finish it at a later time.

Uploading Supporting Documents
You may be prompted to attach additional documents. Follow these steps:
1. Click Browse. Alternatively, you can drag the file into the dotted rectangle area.

2. After the Choose File to Upload window appears, select the file that you want to upload.
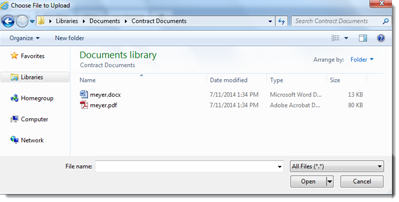
3. Click Open.
4. Select the Document Type from the dropdown menu. Note: If this document needs to be shown on a summary view, click on the slider to change to Yes.
Repeat Steps 1 through 4 if there are multiple documents to upload. If you need to remove a specific file, click X to the left of the file.
Responding to an Nbox Notification
An Nbox Notification is an automated message which appears in your Nbox with a message bubble icon. Notifications provide important information related to a workflow and do not require a response.
![]()
1. Click anywhere on the Notification row. Message details will appear in the reading pane below.
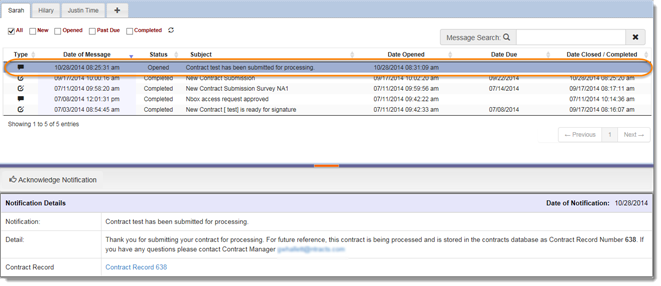
2. After reading the Notification Details, click Acknowledge Notification. The system marks the message as Completed.

Nbox Sorting
Clicking on the column title once will sort the content in descending order. Clicking on the column title a second time will sort the content in ascending order.

Nbox Filtering
You can filter the items according to:
- All – Selecting this checkbox displays all messages, regardless of status.
- New – Selecting this checkbox displays all unopened messages.
- Opened – Selecting this checkbox displays all opened messages.
- Past Due – Selecting this checkbox displays all past due messages. This may include New and Opened messages.
- Completed – Selecting this checkbox displays all Completed and Completed (P) by proxy messages.
Place a checkmark in the box next to the desired filter(s).

Filters will remain in the status they were previously, upon login. In addition, each Nbox that you have proxy access to will have separate filtering.
You can also search the messages in your Nbox by typing a term or numeral value in the Message Search box. This search will look at information you can see on the message list, such as contract record number, subject line content and dates.

Nbox Proxy
You can request that other users grant you access to their Nbox. Use these steps to request access to another user’s Nbox:
1. Click Nbox on the menu bar.
![]()
2. Click the + tab that appears to the right of the existing tab(s) in your Nbox.

3. In the Add an Nbox Tab window, enter the Email Address and Name fields with the information for the person whose Nbox you are requesting access to. Name field will be the name displayed on the tab.
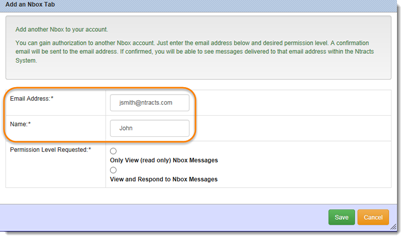
4. Select the permission level you want to request:
-
- Only View (read-only) Nbox Messages – Allows you to see the messages in the Nbox but not complete an Action or acknowledge a Notification. You might request this level of access if you are a supervisor monitoring your employees’ queues.
- View and Respond to Nbox Messages – Allows you to see the messages in the Nbox and take action on the messages. You might request this level of access if you are monitoring a coworker’s queue.
5. Click Save.
An email message is sent to the Nbox owner with the option to approve or deny the proxy permission. If the user has not yet set up an Nbox, the message can be used as a reminder to set it up and grant you permission to it.
Primary and proxy tabs will display in alphabetical order based on the tab name.
When a proxy user completes a message on behalf of the Nbox owner, a status of Completed (P) in the Nbox Status column will appear. Additionally, hovering over that status will create a pop-up to appear showing the email address of the person who completed the message. The status of Completed (P) and hover pop-up with email address will also appear on the Actions tab.
Removing an Nbox Proxy
1. To remove another user’s Nbox tab, click on the tab.

2. Click on the x to delete the tab.

3. After the Confirm removing window appears, click Remove. If you change your mind, click Cancel.

Nbox Refresh
There are two ways to refresh your Nbox.
- Click on refresh.

- Click on Nbox on the menu bar.
