At a Glance

| Contract Record Number and Contract Name | |
|
|
Contract Record Tabs Record Details tab: general information about the contract Datasheet tab: contract details, affiliated and responsible parties, and compensation information about the contract. A collection of datasheets may be used to capture changes over time. Documents tab: associate documents with the contract by scanning, uploading, or linking to a web page Actions tab: view workflow actions Comments tab: add or review comments related to the contract record Related Contracts tab: create a relationship between two contracts. For example, this contract may be an addendum to the related contract. History tab: log of activities with regard to the contract record |
| |
Toolbar Save: Your changes will not automatically save. Click to save your progress. Duplicate: Create a new contract record based the current one open. This will duplicate the Record Details and Datasheet tabs only. Close: Close the current window. Delete: Delete the contract record. |
Entering a New Contract
The following instructions will identify all available fields within the contract record. Complete the tabs as directed by your internal system administrator.
To enter a new contract from the Contracts App, follow the steps below:
1. Click on the Apps menu and select the Contracts app.

2. When you open the Contracts app, click on New Contract Record in the upper right.

3. The New Contract Record will open in a new window. Complete the information in the tabs as described below:
- Record Details tab
- Datasheet tab
- Documents tab
- Actions tab
- Comments tab
- Related Contracts tab
- History tab
4. Click Save. You can click Save multiple times while working on the contract record to save your progress.
![]()
| Upon saving a contract record, a validation is performed to ensure that the Termination date on the current Datasheet is not before the Commencement date on the Record Details tab. If so, a dialog box will appear with the message, “Termination Date cannot be before Commencement date. Record was not saved.” The OK button on the dialog box returns the user to the contract record. |
5. Click Close.
![]()
Record Details Tab
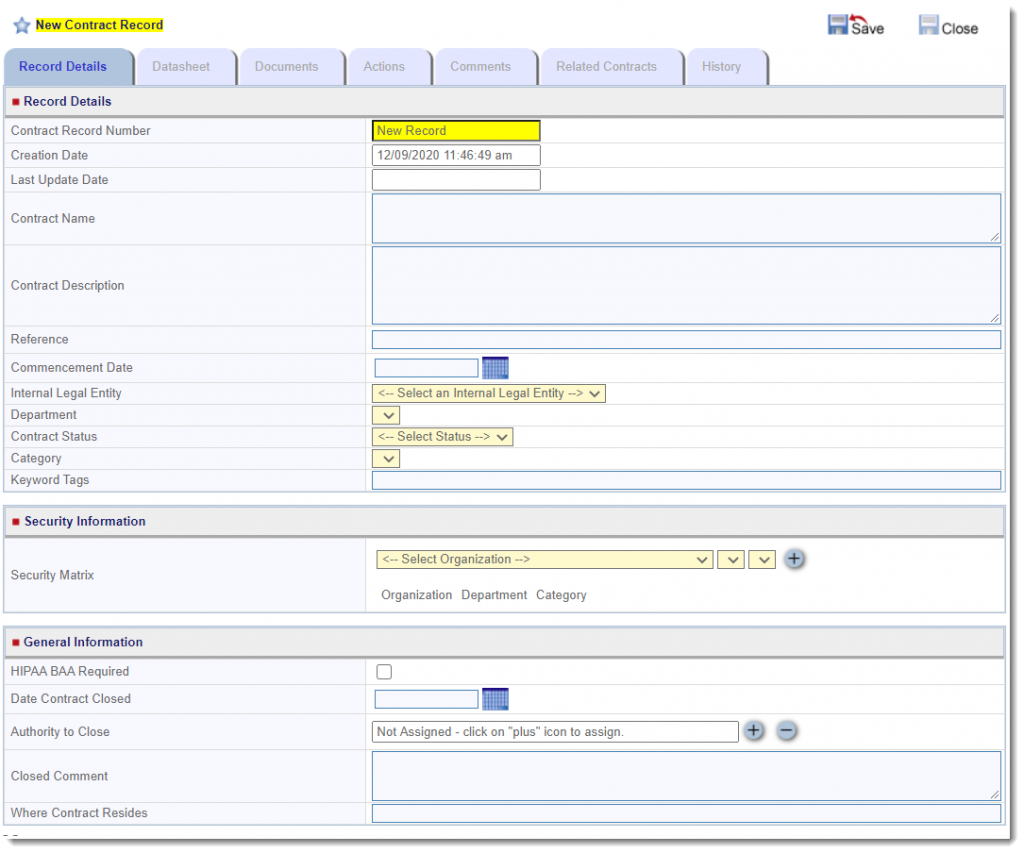
*denotes required field
The Contract Record Number is automatically assigned by your system.
The Creation Date is auto filled with the date and time the record was created.
The Last Update Date is updated by the system.
1. In the Contract Name* field, enter a name or title for this contract record.
2. In the Contract Description field, enter an appropriate description.
3. In the Reference field, enter any key information that will help you reference this contract record.
4. In the Commencement Date field, click on the date picker or type the date as MM/DD/YYYY.
5. From the drop down menu, select the Internal Legal Entity* within your organizational structure to be the owner of this contract.
6. From the drop down menu, select the Department*.
7. From the Contract Status* drop down menu, select the status of the contract.
8. From the Category drop down menu, select the category.
9. In the Keyword Tags field, enter the keywords that you can use later to search for this contract record.
 |
Upon adding a category, you will be prompted to save the contract record.
In the Security Matrix section, the combination of selections made for Internal Legal Entity, Department, and Category will display in the Security Matrix section. If additional organizations, departments, and categories need access to this record you can add additional lines to the matrix. To do so, make the appropriate selections from the dropdowns and click the plus sign. |
10. Select the HIPAA BAA Request checkbox to indicate that this contract requires a HIPAA Business Associate Agreement.
11. In the Date Contract Closed field, if the contract has closed, click on the date picker or type the date as MM/DD/YYYY.
12. From the Authority to Close field, click + to search for the individual who has authority to close this contract from the address book. Click Select next to the name of the person to whom you want to give authority to close the contract.
 |
Click – to remove a name. |
13. In the Closed Comment field, enter comments that would be important to note upon closure of the contract record.
14. In the Where Contract Resides field, enter the physical location of the actual contract.
15. Click Save.
Datasheet Tab
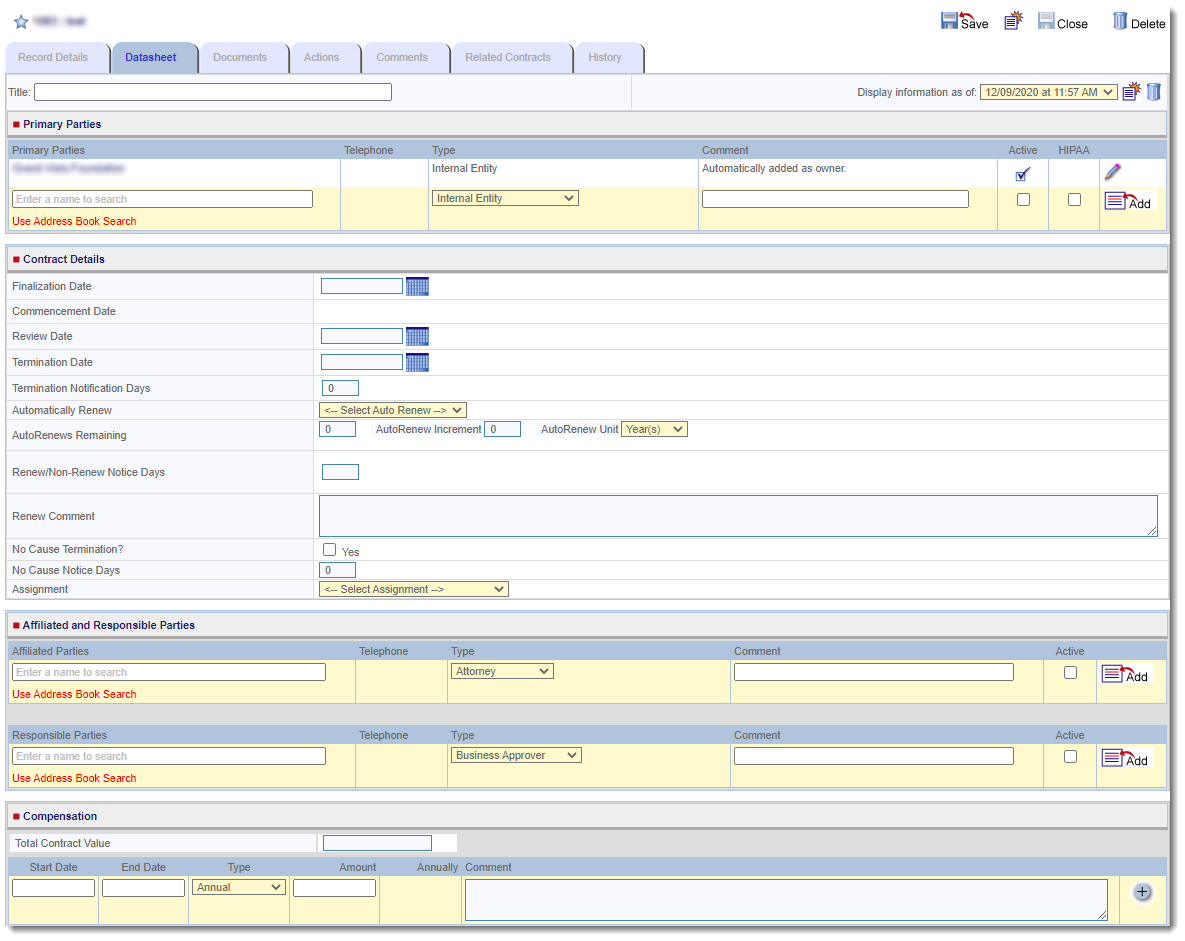
Use this tab to capture primary parties, contract details, affiliated and responsible parties, and compensation information. Multiple datasheets provide a historical view of the contract record.
Datasheet: Title
The title field is an optional free form text field particularly useful for when multiple datasheets are used.
![]()
Datasheet: Primary Parties Section
This section identifies the parties executing the contract. The organization owner that you selected on the Record Details tab appears automatically as a primary party.
To add a primary party that is an existing Address Book entry:

1. On the bottom row of the Primary Parties column, enter the name or partial name of the desired individual or organization. The results will display if any matches are found.
2. Select name from the list.
3. The phone number field will be populated by the address book entry data. Select the Type from the drop down menu.
 |
This type is not the same as an Address Book Type. The Primary Party Type you select here is based on the entry’s association to the contract record. |
4. If applicable, type a comment for this primary party in the Comment field.
5. Click Add located in the last column.
6. Click Save.
To add a primary party that does not already exist in the Address Book:

1. On the bottom of the Primary Parties column, click Use Address Book Search to open the search dialog.
2. Select the appropriate tab for Individual or Organization.
3. Click the New Entry icon to add a new Address Book entry.
4. Follow the process for creating a new Address Book entry defined in Steps 5 through 8 in Adding a New Address Book Entry for an Individual or Adding a New Address Book Entry for an Organization.
5. After creating the Address Book entry, a new window will open. Select the Type from the drop down menu.
 |
This type is not the same as an Address Book Type. The Primary Party Type you select here is based on the entry’s association to the contract record. |
6. If applicable, type a comment for this primary party in the Comment field.
7. Click Add.
The phone number field will be populated by the address book entry data.
8. Click Save.
To edit a primary party:
1. Locate the desired primary party. At the end of the row, click the pencil.
2. Make the necessary changes.
3. Click Close located in the last column.
4. Click Save.
To delete a primary party:
1. Locate the desired primary party. At the end of the row, click the trash can.
2. When prompted, click OK to verify the deletion.
3. Click Save.
Datasheet: Contract Details Section
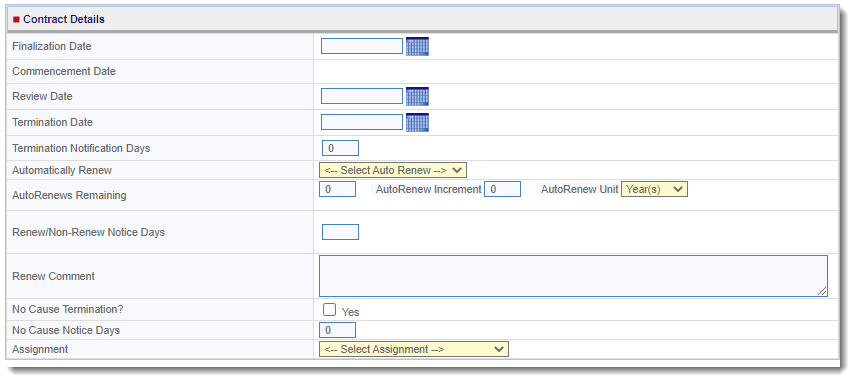
This section identifies details of the contract regarding termination, dates, renewal, and assignment information. Complete the following fields:
1. The Finalization Date is an optional date field that your organization may choose to use with your internal business process.
2. The Commencement Date that you selected on the Record Details tab is auto populated.
3. The Review Date is an optional date field that your organization may choose to use with your internal business process.
4. Click on the date picker or type the date as MM/DD/YYYY to enter the Termination Date.
5. For an internal message to be sent as part of the workflow process (requires configuration), enter the number of days in the Termination Notification Days field.
6. From the Automatically Renew drop down menu, select the applicable renewal option at the end of the current term.
7. When applicable, complete the AutoRenews Remaining fields.
8. Enter the number of days the contract requires in Renew/Non-Renew Notice Days.
9. In the Renew Comment field, enter optional information that is pertinent to the contract’s renewal.
10. If this contract has a no cause termination provision, select the No Cause Termination? checkbox.
11. If applicable, enter the number of days in No Cause Notice Days.
12. From the Assignment drop down menu, select the appropriate assignment option from the list based on the contract.
Datasheet: Affiliated and Responsible Parties Section
Adding or Editing an Affiliated Party
![]()
This section identifies the organizations or people who, while not signatories to the contract, have rights under the contract.
To add an affiliated party that is an existing Address Book entry:
1. On the bottom row of the Affiliated Parties column, enter the name or partial name of the desired individual or organization. The results will display if any matches are found.
2. Select name from the list.
3. The phone number field will be populated by the address book entry data. Select the Type from the drop down menu.
 |
This type is not the same as an Address Book Type. The Affiliated Party Type you select here is based on the entry’s association to the contract record. |
4. If applicable, type a comment for this affiliated party in the Comment field.
5. Click Add located in the last column.
6. Click Save.
To add an affiliated party that does not already exist in the Address Book:
1. On the bottom of the Affiliated Parties column, click Use Address Book Search to open the search dialog.
2. Select the appropriate tab for Individual or Organization.
3. Click the New Entry icon to add a new Address Book entry.
4. Follow the process for creating a new Address Book entry defined in Steps 5 through 8 in Adding a New Address Book Entry for an Individual or Adding a New Address Book Entry for an Organization.
5. After creating the Address Book entry, a new window will open. Select the Type from the drop down menu.
 |
This type is not the same as an Address Book Type. The Affiliated Party Type you select here is based on the entry’s association to the contract record. |
6. If applicable, type a comment for this affiliated party in the Comment field.
7. Click Add.
The phone number field will be populated by the address book entry data.
8. Click Save.
To edit an affiliated party:
1. Locate the desired affiliated party. At the end of the row, click the pencil.
2. Make the necessary changes.
3. Click Close located in the last column.
4. Click Save.
To delete an affiliated party:
1. Locate the desired affiliated party. At the end of the row, click the trash can.
2. When prompted, click OK to verify the deletion.
3. Click Save.
Adding or Editing a Responsible Party
![]()
This section identifies those people within your organization who have responsibilities with regard to this contract.
To add a responsible party that is an existing Address Book entry:
1. On the bottom row of the Responsible Parties column, enter the name or partial name of the desired individual or organization. The results will display if any matches are found.
2. Select name from the list.
3. The phone number field will be populated by the address book entry data. Select the Type from the drop down menu.
 |
This type is not the same as an Address Book Type. The Responsible Party Type you select here is based on the entry’s association to the contract record. |
4. If applicable, type a comment for this responsible party in the Comment field.
5. Click Add located in the last column.
6. Click Save.
To add a responsible party that does not already exist in the Address Book:
1. On the bottom of the Responsible Parties column, click Use Address Book Search to open the search dialog.
2. Select the appropriate tab for Individual or Organization.
3. Click the New Entry icon to add a new Address Book entry.
4. Follow the process for creating a new Address Book entry defined in Steps 5 through 8 in Adding a New Address Book Entry for an Individual or Adding a New Address Book Entry for an Organization.
5. After creating the Address Book entry, a new window will open. Select the Type from the drop down menu.
 |
This type is not the same as an Address Book Type. The Responsible Party Type you select here is based on the entry’s association to the contract record. |
6. If applicable, type a comment for this responsible party in the Comment field.
7. Click Add.
The phone number field will be populated by the address book entry data.
8. Click Save.
To edit a responsible party:
1. Locate the desired responsible party. At the end of the row, click the pencil.
2. Make the necessary changes.
3. Click Close located in the last column.
4. Click Save.
To delete a responsible party:
1. Locate the desired responsible party. At the end of the row, click the trash can.
2. When prompted, click OK to verify the deletion.
3. Click Save.
Datasheet: Compensation Section

This section identifies compensation information for the contract.
To add compensation information:
1. In the Total Contract Value field, enter the total value of the contract.
2. In the Start Date field, enter the start date of the contract in a MM/DD/YYYY format.
3. In the End Date field, enter the end date of the contract in a MM/DD/YYYY format.
4. From the Type drop down menu, select the compensation frequency.
5. In the Amount field, enter the compensation amount for each payment. The system calculates this value from the information you enter in the two previous fields in the Annually field.
6. If applicable, enter comments that are pertinent to the compensation.
7. Click + after completing the fields.
8. Click Save.
You can edit the information by clicking the pencil on the right side of the record or remove the information by clicking the trash can.
To edit compensation information:
1. Click the pencil in the last column.
2. Make the necessary changes.
3. Click close located in the last column.
4. Click Save.
Documents Tab
Use this tab to associate documents with the contract by:
- scanning a hard-copy document

This feature requires additional configuration on your local machine. Please contact Ntracts at support@ntracts.com. - uploading documents from your computer, such as word processing documents, spreadsheets, e-mails, Adobe Acrobat files, graphics files, and scanned images
- linking to a web page
Scanning a Document
 |
This feature requires additional configuration on your local machine. Please contact Ntracts at support@ntracts.com. |
To add a document through the scan option:
1. Click Scan next to the Add New Document prompt. A new window will open.

2. In the new window, enter the name of the document.

3. Click Next.
4. Select the options you desire: Scan All Pages or Use ADF (Automatic Document Feeder)
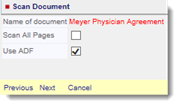
5. If this is your first time scanning, click Select Scanner to select your scanning source. If this is not your first time, click Scan and skip to Step 7.

6. From the pop-up, click to highlight the desired source and click Select.
NOTE: Options listed in this window will depend on your available sources.
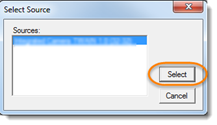
7. At this point, your selected source will open. Follow the prompts based on your specific scanning source.
8. After the document(s) has scanned, click Next.

9. Select the Document Type and Content Type from the drop down menus. The Document Date will automatically default to the current date.
10. Add a description of the document.
11. Select the Show on Summary checkbox if you want the documents to show on a summary view.
12. Click Add Document.
The uploaded document is now listed. You can edit the information by clicking the pencil on the right side of the document listing or remove the information by clicking the trash can.
13. Your changes will not automatically save. Click Save.
Uploading a Document
You can upload documents from your computer, such as word processing documents, spreadsheets, e-mails, Adobe Acrobat files, graphics files, and scanned images. To upload a document through the scan option:
1. Click Upload next to the Add New Document prompt. A new window will open.
2. In the new window, locate the document by clicking Browse.

3. After the Chose File to Upload window appears, select the file that you want to upload.
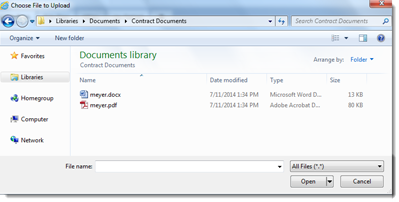
4. Click Open.
5. Click Next.

6. Select the Document Type and Content Type from the drop down menus. The Document Date will automatically default to the current date.
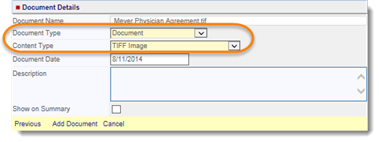
7. Add a description of the document.
8. Select the Show on Summary checkbox if you want the document to show on a summary view.
9. Click Add Document.
The uploaded document is now listed. You can edit the information by clicking the pencil on the right side of the document listing or remove the information by clicking the trash can.
10. Your changes will not automatically save. Click Save.
Linking to a Web Page
To link to a web page:
1. Click Link next to the Add New Document prompt. A new window will open.
2. Enter the Name of the URL, the link, and description.

3. Click Add Link.
The linked document is now listed. You can edit the information by clicking the pencil on the right side of the link listing or remove the information by clicking the trash can.
4. Click Save. Likewise, if you edit or remove any information, click Save.
Comments Tab
Use this tab to add comments related to the contract record. Comments you enter on this tab are historically tracked. The tab includes the date the comment was entered, who it was entered by, the last time it was updated, and who it was updated by. To enter a comment:
1. Enter the comment and then click on +.

The comment is now listed. You can edit the information by clicking the pencil on the right side of the comment or remove the information by clicking the trash can.
2. Click Save. Likewise, if you edit or remove the comment, click Save.
The comments appear in ascending order based on when the comments were entered.
Related Contracts Tab

Use this tab to create a relationship between two contracts. For example, this contract may be an addendum to the related contract. Follow these steps to establish the relationship between contracts:
1. In the Search for Contract field, enter a search term or phrase of the related contract. Once the search term or phrase is recognized, a window will appear below the Search field with any matching results.

2. Select the desired option from the results. The Contract Record number and name will be filled in below.
3. From the This contract is (x) drop down menu, select the relationship of the contract you are currently editing to the related contract.

4. From the And contract (x) is drop down menu, select the relationship of the related contract to the contract you are currently editing. This relationship appears on the related contract’s Related Contracts tab.

5. Click Add to establish the relationship between the contracts.
The contract relationship is now listed. You can remove the information by clicking the trash can.
6. Click Save. Likewise, if you remove any information, click Save.
Custom Tabs

Custom tabs will appear to the right of the History tab. These customized tabs were designed specifically by your health system. Custom tabs are added based on categories selected on the Record Details tab. Additionally, custom tabs are associated with the datasheet. If you need assistance with these tabs, contact your internal system administrator.
Reviewing Contract Records
Documents Tab
If many documents are associated with the contract, you can use the sorting, filtering, and searching tools to find a particular document. You can edit the information about a document by clicking the pencil. You can remove a document you already associated by clicking the trash can.
- Document Filters

1. Click on the Documents tab.
2. Select your document type from the drop down menu.
3. Enter your search term in the Document Content Contains field.
| The words AND, OR, and NEAR, can be interpreted as part of the search phrase when used without quotation marks. Example: A search for health and life science will return documents containing the full phrase. A search for “health” and “life science” will return documents which contain both of the search terms (phrases set off by quotes). |
4. Click Search.
- Document Sorts
1. Click on the Documents tab. By default, the documents appear in ascending order based on when the documents were added.
2. Click on the column title once to sort the content in ascending order. The column heading will change to orange indicating a sort is applied and sort name will be displayed in the Sort by line.
3. Click on the column title a second time to sort the content in descending order. To add a second sort, click the desired column heading. The second sort will be applied; the column heading is added to the Sort by line. Sorts are applied in the order selected.
To remove the sort or to change the order in which the sorts are applied, click Reset Sort.
Actions Tab

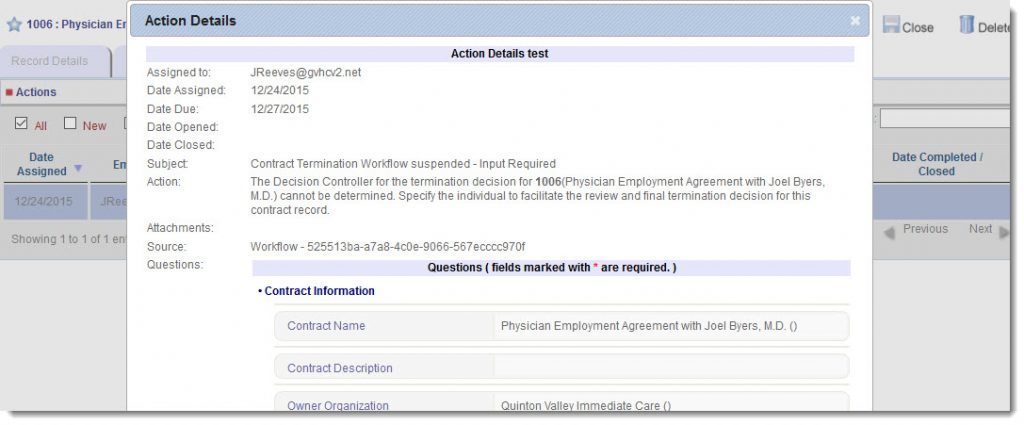
Use this tab to view workflow actions across all Nboxes. The Actions tab provides detailed information regarding Nbox messages related to this contract record. This tab is an information screen only. On the Actions tab you will see the:
-
- Date Assigned
- Email Address
- Subject/Action
- Status
- Date Due
- Date Opened
- Date Complete/Closed
- DocuSign information, when applicable
Actions Sorting
Clicking on the column title once will sort the content in ascending order. Clicking on the column title a second time will sort the content in descending order.
Actions Filtering
You can filter the items according to:
- All – Selecting this checkbox displays all actions, regardless of status.
- New – Selecting this checkbox displays all unopened actions.
- Opened – Selecting this checkbox displays all opened actions.
- Past Due – Selecting this checkbox displays all past due actions. This may include New and Opened actions.
- Completed – Selecting this checkbox displays all Completed actions.
Place a check mark in the box next to the desired filter.
If your permissions allow, click on a line to open the message and see responses if applicable.
Comments Tab
Use this tab to review historical comments about the contract. The tab includes the date the comment was entered, who it was entered by, the last time it was updated, and who it was updated by. To edit or delete a comment, follow these steps:
-
-
- You can edit the information by clicking the pencil on the right side of the comment or remove the information by clicking the trash can.

- When you are finished editing or deleting a comment, click Save.
- You can edit the information by clicking the pencil on the right side of the comment or remove the information by clicking the trash can.
-
History Tab
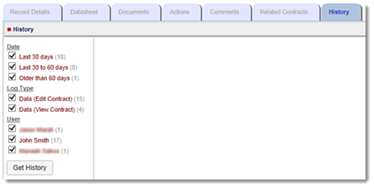
Use this tab to see a list of every interaction within the contract record, including what users clicked on, comments and information changes. This tab is an information screen only.
1. After selecting a contract record, click on the History tab.
2. On the History tab you will see a sidebar for search filter options that include Date, Log Type, and User. By default, all the check boxes are selected. Deselect any check boxes not desired.
3. Click Get History.
You can specify the number of entries that appear by using the drop down.

History Sorting
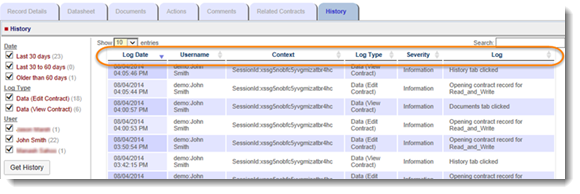
After clicking Get History, you can sort your history:
1. Click on the column title once to sort the content in ascending order.
2. Click on the column title a second time to sort the content in descending order.
History Search

After clicking Get History, you can search to locate specific content.
1. Enter your search term such as Log Date (using MM/DD/YYYY format), Username, Context, Log Type, Severity, and Log into the Search field.
2. Matching results will appear below the column headings. If there is no match, the words “No matching records found” appear.
Marking a Contract Record as a Favorite
To designate a contract record as a favorite:
1. Open the contract record.
2. Click on the blue star next to the contract name when you are editing or viewing the contract record. Once it is marked as a favorite the star will be yellow.

To unmark a contract record as a favorite:
1. In the Contract App, click on the Favorites tab.
2. Click the red x next to the contract record.

Editing Contract Records
Datasheet
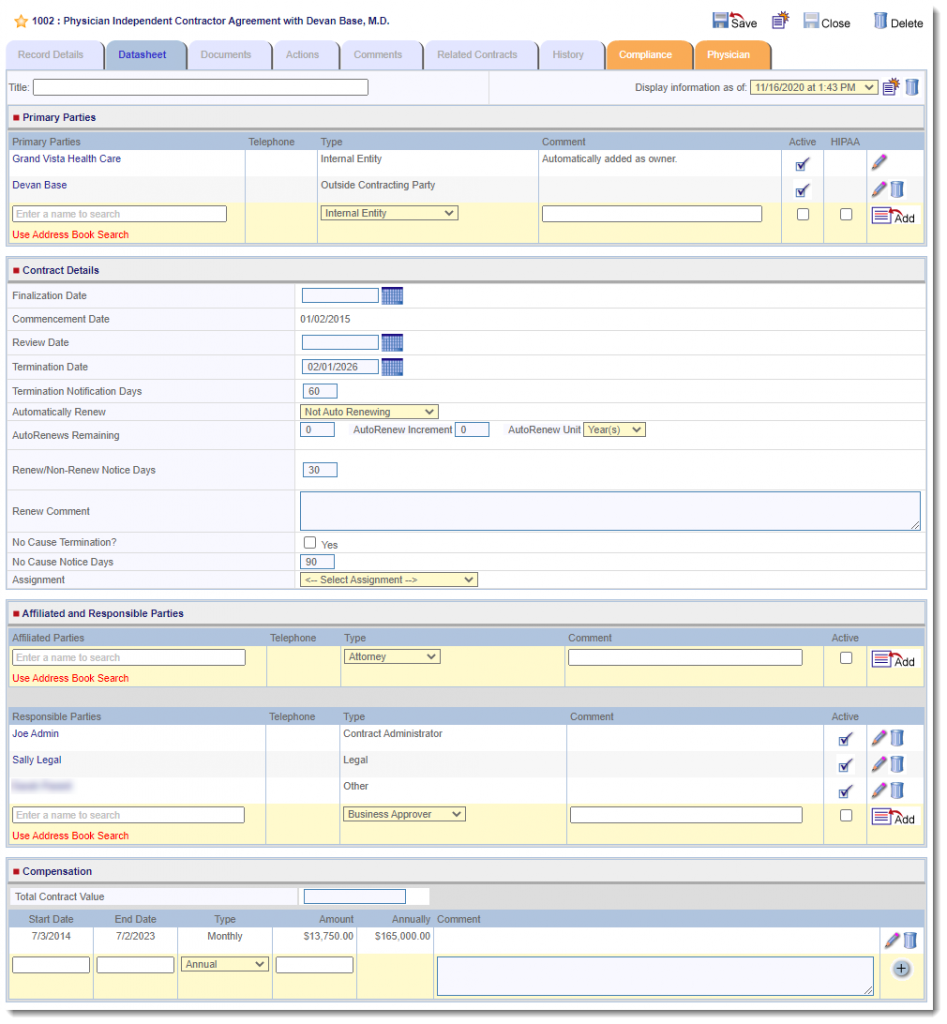
Use this tab to edit primary parties, contract details, affiliated and responsible parties, and compensation information. Multiple datasheets provide a historical view of the contract record.
Archiving and Adding a New Datasheet
1. From the Datasheet tab, click the new datasheet icon next to the time and date drop down menu. NOTE: All related custom tabs will be replicated.

2. When prompted to save the record, click OK.
3. The datasheet and any custom tabs are duplicated and the new version is now displayed. Make any changes and click Save.

Viewing a Previous Datasheet
From the Datasheet tab, select the desired datasheet from the drop down menu.
| Depending on which datasheet is selected, the custom tab data that corresponds with that datasheet will be displayed. The information will be accurate to the Display information as of field date. |

Deleting a Datasheet
1. From the Display information as of drop down, select the datasheet you wish to delete. All related custom tabs will also be deleted.
2. Click on the trash can.

3. Click Save.
Updating Contract Status
As a contract moves through its life cycle, the status of the contract record may need to be updated manually. This can be done on the Record Details tab within the contract record.
NOTE: Depending on your permissions, the ability to update a contract record’s status may not be available. Contact your internal system administrator if you think you need this access.
To update the status of a contract record:
1. Open the contract record.
2. On the Record Details tab, click on the Contract Status drop down menu.
3. Select the appropriate status of the contract record.
4. Click Save.
Deleting a Contract Record
To delete a contract record:
1. Open the contract record.
2. In the toolbar located in the upper right corner, click on the trashcan.
3. Click OK in the dialog box to confirm.